OSCustomization for VM builds using PowerCLI

VM builds are probably the boring tasks that are repeatedly done by any vSphere Admins be it in Lab or Production, so it’s a good idea to automate them and spend time on better things. In this post i will be showing the script that i have been using since many years when i come across those VM builds and it only takes less than 5 min to create a VM – love automation!

In order to use the script, we need to actually create a OS customization first and this is a one time task and also we need to have a Windows VM Template created. Once you have it just bring up the PowerShell console and use the below script, the script prompts for VM name, Reserved IP, Windows Version and VM port group information and once you enter them and that’s it.

<#
.SYNOPSIS
This script deploys a VM from template, joins the Domain;Uses VMware built-in OS Customization. Tested for Windows Server 2008 R2 and 2012 R2.
.DESCRIPTION
Script prompts for name of the VM you want to deploy, IP, VLAN and Windows Version
.NOTES
Tested on PowerCLI v6
#>

Param(
[string]$VMName = (Read-Host "Enter the Name of the VM "), 
[string]$VMIP = (Read-Host "Enter the IP reserved for the VM "),
[string]$PortGroup = (Read-Host "Enter the VLAN for the VM, example 10 "),
[string]$Winver = (Read-Host "Enter the Windows version, example 2012 ")
)

#Import PowerCLI Module
Import-Module VMware.PowerCLI

# Connect to vCenter
Connect-VIServer vcenter.vmmaster.local

# Choose the right nicmapping for the vlan
if ($PortGroup -eq 10)
{
$vmvlan = 10
$pgnicmapping = "vlan10" 
$vmGateway = "<IP Here>"
}
elseif ($PortGroup -eq 20)
{
$vmvlan = 20
$pgnicmapping = "vlan20"
$vmGateway = "<IP Here>"
}

# Choose the right template
if ($Winver -eq 2008)
{
$vmTemplate =Get-Template -Name Template_Win_2008R2
}
else
{
$vmTemplate = Get-Template -Name Template_Win_2012R2
}

#Select Prod Cluster
$vmCluster = Get-Cluster -Name <Cluster Name>

#Select a Random Datastore connected to Prod Cluster
$vmDatastore = $vmCluster | Get-Datastore | Where {($_.ExtensionData.Summary.MultipleHostAccess -eq "True") -and ($_.FreeSpaceMB -gt "102400") -and ($_.State -ne "Maintenance")} | Get-Random

#Clone the Customization Spec
$vmSpecification = Get-OSCustomizationSpec -Name Windows_Builds | New-OSCustomizationSpec -Name WindowsTemp -Type NonPersistent

#Update the portgroup and gateway based on the VLAN entered
$tempnicmapping = Get-OSCustomizationSpec $vmSpecification | Get-OSCustomizationNicMapping | Set-OSCustomizationNicMapping -ipmode UseStaticIP -IpAddress $VMIP -SubnetMask 255.255.255.0 -DefaultGateway $vmGateway -Dns <DNS IPs here>

#Build the VM
New-VM -Name $VMName -Template $vmTemplate -OSCustomizationSpec $vmSpecification -ResourcePool $vmCluster -Datastore $vmDatastore -DiskStorageFormat Thin

Write-Host " New VM Details `n Name:`t $VMName `n OS:`t Windows Server $Winver R2 `n IPAddress:`t $VMIP `n Datastore:`t $vmDatastore" -ForegroundColor Gray

Start-Sleep -Seconds 30

#Set the right portgroup for the VM
Get-VM $VMName | Get-NetworkAdapter -Name "Network adapter 1" | Set-NetworkAdapter -NetworkName $pgnicmapping -Confirm:$false -StartConnected:$True

#Power On the VM for the customization to start
Write-Host " Powering on the VM $VMName" -ForegroundColor Green
$vm = Start-VM $VMName -Confirm:$false

Write-Host "`n Waiting for the customization to complete! Monitor the console to see the progress.......... `n" -ForegroundColor Green

while (Get-VM $VMName | where {$_.PowerState -eq "PoweredOn"})
{
$vmEvents = Get-VIEvent -Entity $VMName
$succeeded = $vmEvents | Where { $_.GetType().Name -eq "CustomizationSucceeded" }
$failed = $vmEvents | Where { $_.GetType().Name -eq "CustomizationFailed" }

if ($failed)
{
Write-Host " Customization failed!" -ForegroundColor Red
return $False
}

if($succeeded)
{
Write-Host " Customization Complete!" -ForegroundColor Green
return $True
}

Start-Sleep -Seconds 10 
}

If you are interested in procedure for creating Customization Specification, here it is. Adding batch files that can install and configure config management tools like Puppet, Chef in the Run Once section will actually ensure all the needed configurations are present for the application.

This slideshow requires JavaScript.

Hope this was informative. Thanks!

How to find the Duplicate VM UUID’s

I recently came across an issue with the VMware SRM where there was a VM having the same UUID in both the primary and recovery site. This VM was a clone from the primary site and was never powered on the recovery site but was rather cloned to template and was used for new builds, over time, everyone forgot about the cloned VM and we recently started seeing issues with the recovery plan. We were unable to test and cleanup the recovery plan. We started seeing the below PANIC message in the SRM logs.

Panic: VERIFY d:/build/ob/bora-3037005/srm/src/recovery/settings/vmRecoverySettingsRepository.cpp:1291

This is a known issue in SRM 6.1 and KB related to this can be found here. The KB does not provide a way to look for the duplicate UUID’s so here is what we used to find the VM UUIDs on both Primary and Recovery vCenter servers.

Run the below code to get the VM’s and their UUIDs in a csv, once you have the csv, its very easy to identify the duplicates. Once you have the VM identified, Shutdown the VM, browse to the VM datastore and backup the vmx file of the VM and edit the value for uuid.bios and re upload to the datastore and power on the VM. Just to make sure it does conflict with the other VMs again, verify the UUID you used is not present in the csv file.

Here are step by step instructions on editing the vmx files Link1 Link2

$vmlist =get-vm | sort name 

forEach ($vm in $vmList) {
       $vmName=$vm | %{(Get-View $_.Id).Name}
       $vmUuid=$vm | %{(Get-View $_.Id).config.UUID}
       echo "$vmName,$vmUuid" | Out-File -Append <path to csv>
}

Here is the sample output from my lab

AD,564dbb42-5c80-879e-889a-5058901c43de
AD01,564d441e-52e1-f65d-8320-41c739f9683e
ADS,564df36b-6d8f-f026-d3b3-56918e66810a
esx01,564d4cc9-767e-42ea-ae45-8dbdbfd55580
esx02,564da15e-9c66-4da2-26ca-912e2a25ed1b
esx03,564df470-444a-6c03-b881-c4b8a5bca030
esxlab1.vcpdcv.lab,564d81df-bfc8-0f68-4a6b-8f26ec0be899
esxlab2.vcpdcv.lab,564d8a89-9cb2-23b1-c307-a039a955c296
esxlab3.vcpdcv.lab,564df488-9e8a-9ef1-3878-c59d15b2a89c

Hope this was informative and useful. Thanks!

Install VCSA 6.7

With the release of vSphere 6.7, like everyone, i was also interested in trying out the installs in my lab and figure out what was changed and how things really looked. To start with, i first installed the VCSA 6.7 in my lab and below is how it went.

This is my current VCSA 6.5 lab build.

snap1

Initially i wanted to a upgrade of the existing appliance but i realized i did a ova install of VCSA 6.5 in my workstation. The upgrade only works for actual install of VCSA on an ESXi host. So, i dropped the idea of upgrading and just decided to do a new install of VCSA 6.7 in the current lab and at some point i want to migrate my vSAN lab to VCSA6.7 and just shutdown the VCSA 6.5. So here we go!

snap2

From the ISO, navigate to the install folder and run the setup file and the below screen pops up. This is similar to the previous versions with some attractive icons. Choose install here.

snap3

Continue with the next few screens, select the type of deployment below and hit Next.


snap7

Since i am already installing my VCSA in a vCenter environment, i will be selecting my existing vcenter server for the appliance install.

snap8

Now, name the VM for VCSA and  set a root password.

snap10

Select the size of the deployment and hit Next

snap11

Select the Datastore for the VM, i have a VSAN datastore in my existing vCenter, so i will make use of that

snap12

Assign IP address and DNS Server details for the VM and hit Next

snap13

Review the settings, sit back and relax after hitting Finish.

snap14

OVA deploy should be in progress…..

snap15

OVA deploy is complete, to configure it click Continue on the below screen. In a browser, navigate to the appliance management at port 5480.

snap16

Click setup on the below screen.

snap17

Click Next

snap18

The IP and VM settings should automatically pop up in here from Stage 1, verify and click next.

snap19

Configure the SSO Domain

snap21

Hit Finish and wait for the Stage 2 to complete.

snap22snap23

Once complete, login back to the appliance management page to view the vCenter build and other details.

snap24

Thats all for today! I am working on a blog series for new features in vSphere 6.7 so i can catch up on the new features and also help others.

Hope this was informative. Thanks!

Part 8 – Docker Commands with VIC

Now that we have a VCH deployed into the environement, it’s time we actually run some native docker commands and see if the containers are being created.

Observe that the Docker Engine here is linux based.

vic34

Browse through the vsanDatastore to see the files related to VCH that we deployed and an images folder is created, this is where all the images are pulled to when docker pull is run.

vic35

Now let’s pull an image from docker hub. When running docker native commands, we should always mention the host with -H as below. Now run couple of containers from the pulled busybox image.

docker -H 10.7.7.10.2376 --tls run busybox
docker -H 10.7.7.10:2376 --tls run --name vmmaster busybox

vic36

To avoid specifying the values each time, we can actually set the VIC parameters as environment variables.

vic38

After having pulled the busybox image and punching in docker run, we see the containers running in the HTML client as below.

vic39

I did another ubuntu image pull. All the native commands are still good here. Below are a few of them

vic40

As discussed earlier, containers appear as running VMs in the virtual infrastructure. The container poweron and poweroff must not be done from VMware client. It is always managed from docker client using native commands.

vic41

Hope this was informative and helped you learn a bit about VMware Integrated Containers. Thanks!

Part 1 – vSphere Integrated Containers

Part 2 – VIC Lab Setup

Part 3 – Deploy VIC Appliance

Part 4 – Obtain vCenter Certificate Thumbprint

Part 5 – Install Client Plugins on VCSA for VIC

Part 6 – Opening Ports on ESXi Hosts

Part 7 – Deploy VCH to vCenter ServerPart 8 – Docker Commands with VIC

Part 8 – Docker Commands with VIC

Part 7 – Deploy VCH to vCenter Server

VCH is the key component of the VIC as this is the resource pool where all the container VMs and the VCH Endpoint VM resides here. VCH is deployed using the vic-machine utility and this can be run from any Windows, Mac or Linux machines. The binaries needs to be downloaded to the machine that runs these commands. Below are the prerequisites for deploying VCH.

  • Download binaries from the VIC appliance
  • Enable DRS on the cluster that is going to host VCH
  • All the hosts have a common datastore to enable easy migration between hosts; we are using vSanDatastore here.
  • Create a vDS with port group named ‘vic-bridge’. Ensure this port group is only used for one VCH and a new port group would be needed if a new VCH has to be deployed. This is for the isolation of the container VMs
  • All the ESXi hosts are licensed with Enterprise Plus
  • DHCP enabled in the network or assign a network profile to the port group with range of IPs.

vic29

From the machine where binaries are run the below command

vic-machine-windows.exe create --target vcsa.vmmaster.vic --user "administrator@vsphere.vic" --password VMware1! --bridge-network vic-bridge --image-store vsanDatastore --no-tlsverify --thumbprint CC:E1:DA:C8:93:4F:60:F9:13:EC:38:38:10:DF:54:CD:FC:61:44:AE

vic30vic31

A successfull deploy of VCH displays the message with details on how to connect to the docker API on the VCH. Observe a new resource pool is created and also there is a VCH Endpoint VM for each VCH deployed.


vic32

The same can be viewed in the HTML 5 client

vic280

In case the VCH deploy did not succed use the below to delete the partially deployed resource pools and any other configurations.

vic-machine-windows.exe delete --target administrator@vsphere.vic:VMware1!@vcsa.vmmaster.vic --thumbprint CC:E1:DA:C8:93:4F:60:F9:13:EC:38:38:10:DF:54:CD:FC:61:44:AE --name virtual-container-host --force

To verify the VCH installation run below from any docker client in the network

docker -H 10.7.7.10:2376 --tls info

vic33

Hope this was informative. Thanks!

Part 1 – vSphere Integrated Containers

Part 2 – VIC Lab Setup

Part 3 – Deploy VIC Appliance

Part 4 – Obtain vCenter Certificate Thumbprint

Part 5 – Install Client Plugins on VCSA for VIC

Part 6 – Opening Ports on ESXi Hosts

Part 7 – Deploy VCH to vCenter ServerPart 8 – Docker Commands with VIC

Part 8 – Docker Commands with VIC

Part 6 – Opening Ports on ESXi Hosts

Port 2377 is used for the communication between VCH and ESXi hosts. The name of the firewall rule is vSPC, if at all the rule is disabled for some reason, one must configure the firewall using other methods like web client and CLI.

Opening 2377 for outgoing connections in ESXi opens 2377 for inbound connections on VCH. Download the VCH binaries from the management portal. The binaries has the vic-machine utility needed for the VCH installation.

vic26

unzip the files to view the binaries and vic-machine utility.

vic27

Navigate to the download location of the binaries and run the below command from the elevated command prompt and make sure to use the right vic-machine file based on the OS you use.

vic-machine-windows.exe update firewall --target vcsa.vmmaster.vic --user "administrator@vsphere.vic" --password VMware1! -compute-resource My_Cluster --thumbprint CC:E1:DA:C8:93:4F:60:F9:13:EC:38:38:10:DF:54:CD:FC:61:44:AE --allow

Since we are going to VCH to a cluster managed by vCenter, we will execute the firewall open command against the vCenter server. This opens the port on all the ESXi hosts in the cluster.

vic28

Hope this is informative. Thanks!

Part 1 – vSphere Integrated Containers

Part 2 – VIC Lab Setup

Part 3 – Deploy VIC Appliance

Part 4 – Obtain vCenter Certificate Thumbprint

Part 5 – Install Client Plugins on VCSA for VIC

Part 6 – Opening Ports on ESXi Hosts

Part 7 – Deploy VCH to vCenter ServerPart 8 – Docker Commands with VIC

Part 8 – Docker Commands with VIC

Part 5 – Install Client Plugins on VCSA for VIC

The next step in the installation is to Install the client plugin for VIC. VIC plugin is very much integrated with the HTML 5 client than the web client. Enable shell on VCSA.

If you have a environment variable set as part of previous installation of VCH, the installation will fail. Ensure it is deleted.

Open a browser and use the VIC appliance IP with port 9443 to view the exact file name. Make a note of the vic tar file including the version. In my case it is vic_1.2.1.tar.gz.

vic20
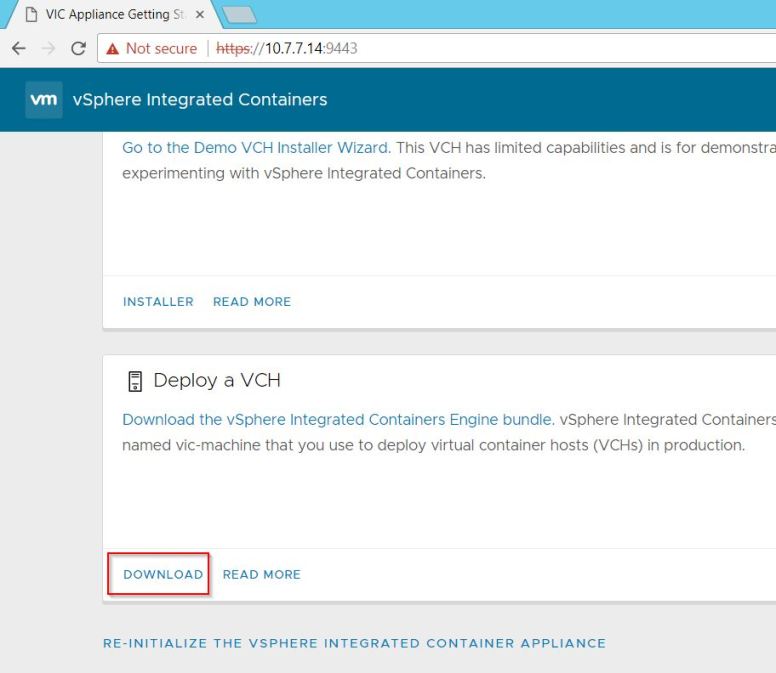
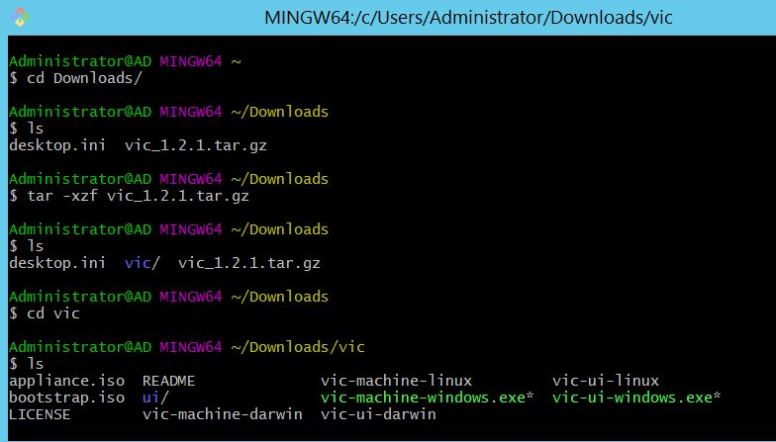
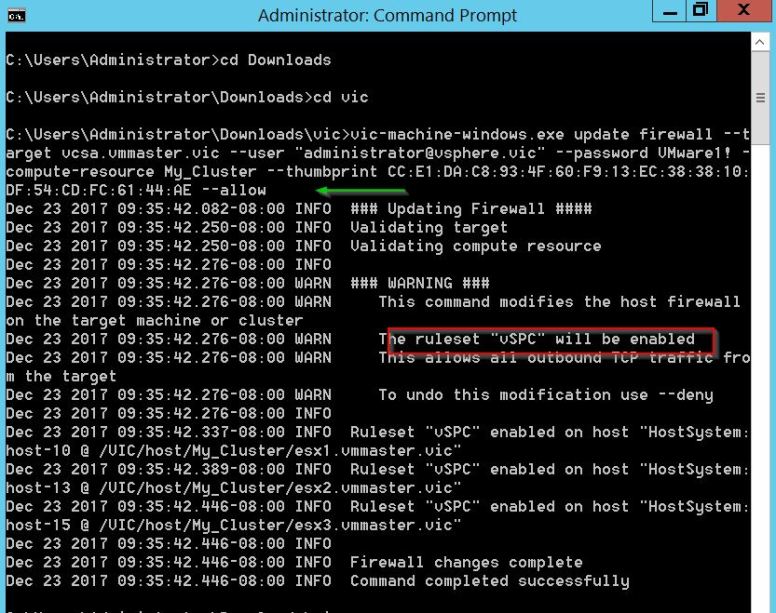
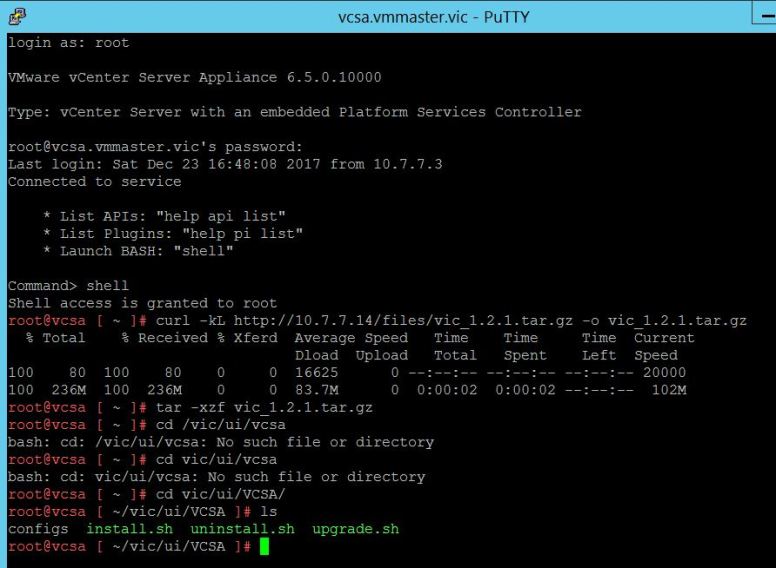
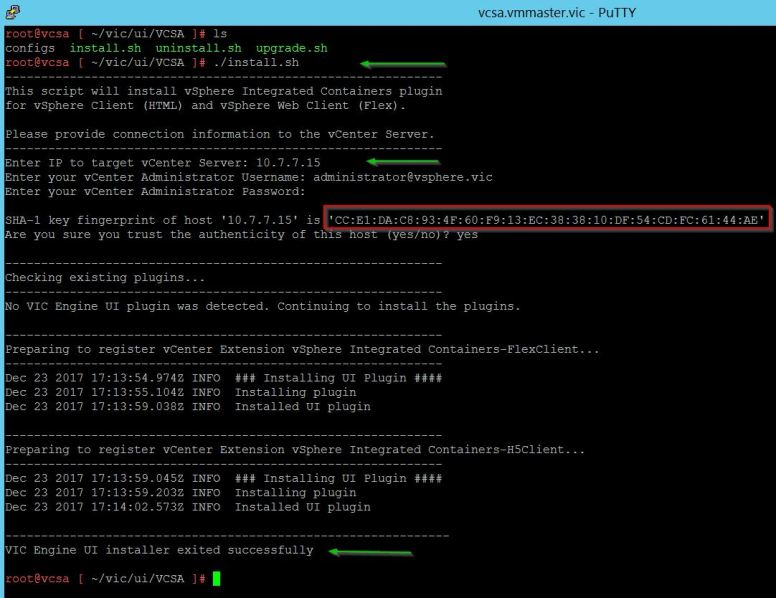
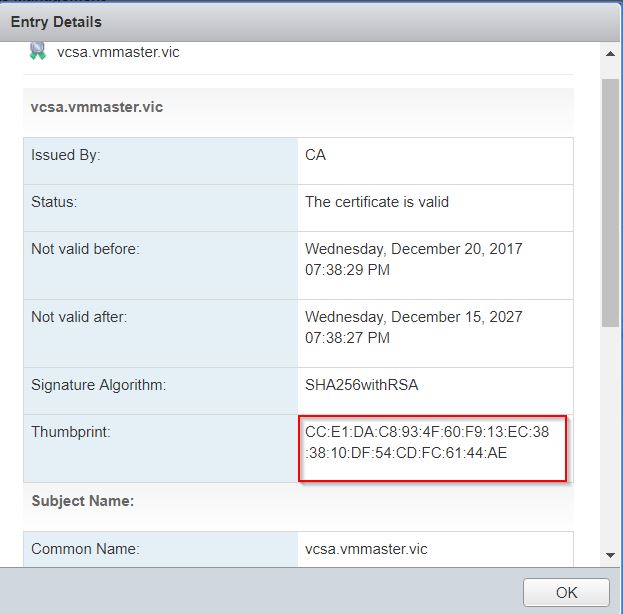
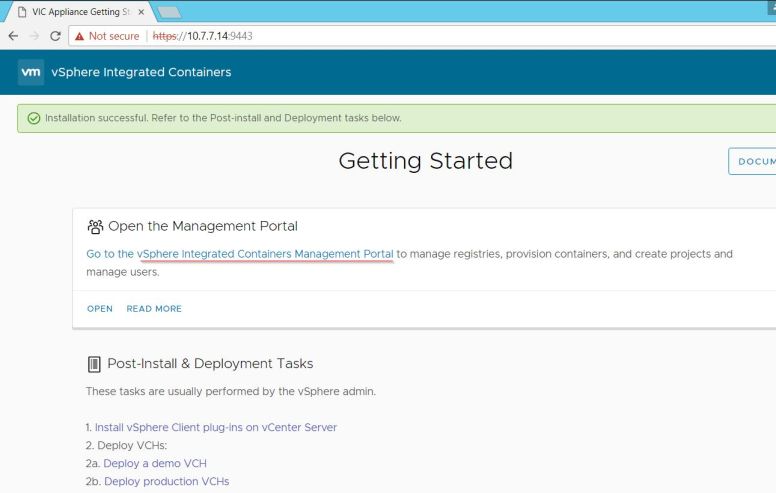
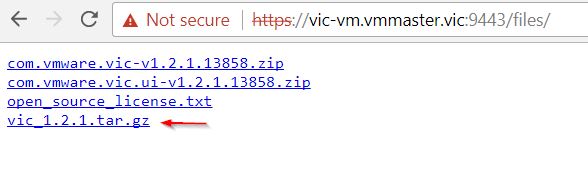
Enable shell and SSH on the VCSA and open a putty session as root adn run the below commands. The first command downloads the tar file and the second one unzips and sets permissions. Navigate the vic/ui/VCSA directory.

curl -kL http://10.7.7.14/files/vic_1.2.1.tar.gz -o vic_1.2.1.tar.gz
tar -zxf vic_1.2.1.tar.gz

vic21

Run the install.sh script to start the plugin installation. Enter the details as and when prompted. Have the vCenter thumbprint handy.

vic22

After the installation is complete, restart the web client and HTML 5 services.

vic23

Refresh the webclient and HTML client to view the vSphere Integrated Containers plugin.

vic24

vic25.jpg

Hope this was informative. Thanks!

Part 1 – vSphere Integrated Containers

Part 2 – VIC Lab Setup

Part 3 – Deploy VIC Appliance

Part 4 – Obtain vCenter Certificate Thumbprint

Part 5 – Install Client Plugins on VCSA for VIC

Part 6 – Opening Ports on ESXi Hosts

Part 7 – Deploy VCH to vCenter ServerPart 8 – Docker Commands with VIC

Part 8 – Docker Commands with VIC

Part 4 – Obtain vCenter Certificate Thumbprint

After deploying the appliance, the next step in the installation would be to install the plugin in the web client but inorder to do that we need to obtain the vCenter certificate thumbprint. We can obtain this by either connecting to the VCSA using SSH or in GUI by connecting to the PSC at port 5480. Enable shell on the VCSA appliance. Here is how

SSH to the VCSA appliance and login as root and execute the below command and make a note of the Fingerprint.

openssl x509 -in /etc/vmware-vpx/ssl/rui.crt -fingerprint -sha1 -noout

vic16.jpg

From the PSC appliance management, below is how

vic17

Click on the _MACHINE_CERT and then Show Details

vic18

This is same as the one you obtained in the shell session.

vic19

Hope this was informative. Thanks!

Part 1 – vSphere Integrated Containers

Part 2 – VIC Lab Setup

Part 3 – Deploy VIC Appliance

Part 4 – Obtain vCenter Certificate Thumbprint

Part 5 – Install Client Plugins on VCSA for VIC

Part 6 – Opening Ports on ESXi Hosts

Part 7 – Deploy VCH to vCenter ServerPart 8 – Docker Commands with VIC

Part 8 – Docker Commands with VIC

Part 3 – Deploy VIC Appliance

Now, it’s time to deploy the VIC appliance and do some basic configurations. Using the deploy OVF option in the web client start the vm deploy.

Give the VM a name

vic1

Now select the compute for the VM.

vic2

Do a thin provision as this is lab and accept the EULA

vic3

vic4

Select the datastore you want the VM to be deployed to. This need not be a shared storage and can also be a local storage but ideally in prod environments it will be a shared storage.

vic5

Select the VM Network

vic6

Configure the OVF with the right IP settings and all these configs are applied when the VM starts.

vic7.jpg

vic8

Review the settings and hit Finish

vic10

Wait untill you see the below screen on the VM console.

vic11

Use the IP configured and open that in a browser and provide the vcenter and PSC (if external) details and hit Continue.

vic12

Launch the management portal and observer the options like managing projects, users and registries.

vic13

Hope this was informative. Thanks!

Part 1 – vSphere Integrated Containers

Part 2 – VIC Lab Setup

Part 3 – Deploy VIC Appliance

Part 4 – Obtain vCenter Certificate Thumbprint

Part 5 – Install Client Plugins on VCSA for VIC

Part 6 – Opening Ports on ESXi Hosts

Part 7 – Deploy VCH to vCenter ServerPart 8 – Docker Commands with VIC

Part 8 – Docker Commands with VIC

Part 2 – VIC Lab Setup

It is quite simple to setup the home lab for VIC. This is like any basic vSphere lab. All you would need is 2-3 ESXi hosts, vCenter, a vDS switch, shared datastore and it is important that your lab has internet connectivity as we will be pulling the docker images from docker hub. The simple way to setup the lab would be to setup a vSAN environment and use vYOS for the internet connectivity if you are using workstation to setup the lab like me.

vic02

Hope this was informative. Thanks!

Part 1 – vSphere Integrated Containers

Part 2 – VIC Lab Setup

Part 3 – Deploy VIC Appliance

Part 4 – Obtain vCenter Certificate Thumbprint

Part 5 – Install Client Plugins on VCSA for VIC

Part 6 – Opening Ports on ESXi Hosts

Part 7 – Deploy VCH to vCenter ServerPart 8 – Docker Commands with VIC

Part 8 – Docker Commands with VIC